Showing posts with label Before and After. Show all posts

Thursday, January 26, 2012

Bunkroom Redo

I finally got round to taking photos of our bunk room.  It takes a long time to fix up these rooms when you are only doing it on the weekends, with lots of breaks for rest.   It also took weeks for this wallpaper to arrive from the UK, as they had to do a new print run *. 

 (Ralph Lauren Great Harbour from the Family Places Collection) 


Remember when we bought the house this room looked like this:


Because I don't know what I am doing I didn't use a proper undercoat so ended up painting the walls about 5 times.   But that was good because it gave me enough time to spot the gaps where the insects and spiders come in (there are many cracks unfortunately, and because it is kind of a basement room the creepies love to come in and sleep.  Not mentioning that to the children.) 

You may recall the many problems this room has: very low ceiling, funny shape, structural pole in middle of one side, and that triangle window.

They had painted the wall around it to look like Pink Floyd's The Dark Side of the Moon cover, so I felt a bit bad painting over it but needs must. 


I got some great advice for this window, including a square blind and plantation shutters.  Here is what I have done.

(Curtains come from Pottery Barn, they are a lovely sage green) 

That's right, nothing.   The reason for this decision is that once I had painted the room and wallpapered this wall I thought it would just be better to leave it as is, with clean lines.  It is not a room which gets used all the time, and the light is not an issue. 

There was also a financial reason.  Because of the shape the plantation shutter would need to be custom made (the window is 1 metre each side).  The quote I got was $1650.   For one shutter.  (I sent it to my husband to give him a nice fright and he emailed me back 'No.  For the avoidance of doubt, no.'  I love that expression.)


So it is just going to be a nudie window for now. 

(this rug is from Freedom Furniture) 


Here is a detail of one corner, note gaps, and corrugated iron ceiling which I love, it is very Australian). 


At the other end of the room I have put in a 'low line' 3 bed bunk.   Here is my son demonstrating the top level.   The bunks work pretty well, although you can see it is a slightly awkward fit.  I found some green ticking linen from Provincial Home. 


Here is the other end of the room.  So far no furniture, I need a side table or something here.  

The chairs are temporary. 


And in case you are wondering, this is the view from triangle window.  The driveway, some gumtrees, and a bit of ocean.   


This is actually the very first room I have painted and redecorated from scratch!  It felt good.  

Happy Australia Day!


* if you live in Australia you will know that a lot of websites will say 'Cannot be shipped to Australia' or some such, because the supplier has some tie up with a business in Australia.  This wallpaper had the same prohibition but I thought I would order it anyway.  And it must have slipped through their systems because it did eventually arrive!

Monday, November 7, 2011

Bunk

We bought a beach house a couple of months back. (Kept that quiet, didn't I?).

I will post some pictures at some point. 

The house is at Fairhaven, on the west coast of Victoria.  An English friend described this area to me as like Cornwall, and the northern beaches of Sydney as like the Mediterranean. I think this is quite apt.  We have certainly had some blustery grey blue weekends down there.     

The house doesn't need really any renovation, which was one of my pre-conditions.  I have hung some new curtains and that is it.

However there is one room which needed a lot of work. It is the downstairs bunk room, which was used by the old owners as storage.  We need it as occasional accommodation so that we have enough room for the children plus guests. 

I mentioned in a previous post that I love the Scandinavian grey and white and wood beach shack style.  Of course not all of that is really suited to the Australian summer, which does get hot, even down here.  And I think pure white walls are can be an issue when you have lots of sun glare. 


So, here is the plan for the bunk room. If I could do a mood board then I would, but I can't, so I am laying it out old style. 

One wall to be wallpapered in this:


(Ralph Lauren from the Family Places range) 

Other walls painted in Chalk USA:


(thanks A-M - I found this on your blog!)


Bunks along one wall maybe like this:


Curtains like this:


(from Pottery Barn)

Floor coverings like this:


(from Freedom Furniture) 

Other furniture is completely undecided.  Although I have bought this lamp from Ikea because I liked the colour:


And I would like some ticking stripe linen like this:


(via Toast) 

I love stripes in children's rooms. 


Oh, and here is a shot of the room itself just before we bought the house.   This room has a Few Issues.  It has a very very low ceiling, less than 190 cm.  And a triangle window!   And a strangely positioned woodenly pole.  And the tiled floor is not ideal but I can cover that.  Arrggh...


So far it has taken me four coats to paint out that blue stripe. I am by no means an expert painter so that might be why. 

The wall to be wallpapered is the black one.   And what oh what could I do to cover that triangle window? The best I have come up with is a plantation shutter, but it would have to be custom made. 

This is where I have got to. 


Wish me luck! 


(Images (1) and (5) from My Scandinavian Retreat (3), (10) and (11) Pinterest.)

Wednesday, September 1, 2010

Office Brown to Wishing Chair Whimsy

I tend to launch my shopping raids on Ikea in military style, swooping in with my printed out page of catalogue, storming the ramparts of the yellow paths which force you to walk past every single room display, searching in a focused, targeted way, more often than not dragging unhappy children behind me who only came because they thought I might buy them one of those enormous stuffed toys from the children's section.   If I plan carefully, I can do the whole in and out thing in 45 minutes.
  

My distaste for the whole Ikea experience means that if I have gone there to buy something I Will Not Leave Empty Handed.   When the shelves I wanted for my daughter were only available in pale dirt brown (I think they call it Birch), did I sensibly retreat?  No, I allowed a 7 year old girl who wants dinosaurs to come back to life persuade me that it would look fine in her room.  Well you know, it didn't look fine.  It looked terrible. It looked like someone had accidentally dumped a piece of 1970s office furniture in a pink elves' forest. 


So I decided to refurbish it.  

I chose last weekend to do this task, armed in advance with lots of advice from the man from Paint Spot.  Never mind that I had the worst hangover 'food poisoning' I have had since university. (Never, never, ever, drink aged Riesling. I think that was how the Germans managed to overrun Alsace those two times last century.)   


One thing I know now is that it is not easy to paint a veneer.  It needs to be sanded (which I did, lazily), it needs two coats of undercoat, it then needed a further two coats of our chosen paint.  I thought I could get away with two coats in total. I was wrong. 


And then I wallpapered the outside. I know that that is not the usual way, and that people  usually wallpaper the inside of shelves, but that meant that the pattern wouldn't be seen that much given all the books intended for the shelves.


And are you wondering about the green? I was.  It is called Green Thorns.  It looks almost florescent in a darkened room. I confess my idea was to go with pale pink or cream but I felt my daughter should have some say and this is what she chose.   And she was quite adamant so I went with it. 


And here it is all filled up.  I call the dolls on the top the House of Representatives.   They sit in judgment on what goes on in this bedroom.   If you look carefully can see Julia Gillard and Julie Bishop.  


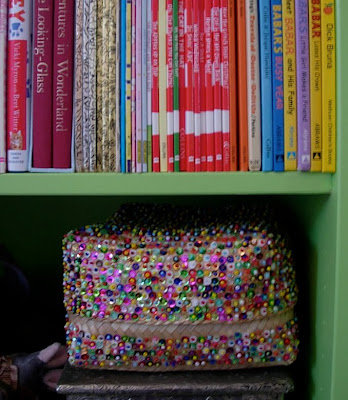
And here is a shot of a sequined basket I found for her a few months back.  I think I like it more than she does! 


A perfect accompaniment to dreams of the Wishing Chair.   Wouldn't mind one of these myself. 


Tuesday, February 16, 2010

Enormous useless speakers made useful and pretty


Allow me to introduce you to a pair of speakers.


Aren't they lovely?  Of course anyone who is under 30 probably won't know this, but this is the way we used to listen to music.  I believe they date from that decade when we wore scrunchies, baggy jeans and ruffled white shirts. 

These speakers have sat quietly in our front sitting room, weighing about 50 kg each and taking up rather a lot of space but otherwise minding their own business for about 9 years now.  Because of course, we have other, much, much, much smaller speakers.  In fact I am not even sure where the connecting leads for these speakers are.  


But do you think I can send them off to speaker heaven? No, I can't.   The following comments have been made about these speakers by a certain person (the owner):

  • you would never be able to buy speakers of this quality today.
  • there is no way we are getting rid of these.
  • you never know -  we might use them at some point.
  • they are hardly taking up any space - you can't even notice them.
  • maybe the children can have them when they are a bit older.
  • maybe one of the neighbour's kids might want them.
You may gather from the above that if I put these speakers out for the hard rubbish collection, it may just break his heart.  But still.  He said he wouldn't mind if I tricked them up a bit. 

So, after thinking a bit, I found a way to hide them and use them.

I have now turned his speakers into two plinth side tables.

First I bought some plywood.  Oh, and a saw, because we don't have one. 

Then I made a cage frame template thing to sit over the speakers.  I got the pieces sawn into the correct shape and stuck it together using ducting tape to make sure they all fitted. 


Then after some lengthy wallpaper sample experimentation, discussed here, I chose a colour, a goldeny Chinese print from GP&J Baker.  And then I waited, and waited, and waited, for it to arrive from the UK (by barge presumably). 

Once it arrived, I wallpapered the wood. 


I then stuck them together with more ducting tape.   This was the hardest bit, as I had to kind of squirm inside the cage to make the bits stick together.  


And then I put the frame over the speaker and slid it into place.  I think you can see from the photos that some of the edges may need a bit more work to make them completely square and neat.    Especially that pesky one on the left.   

And here they are: useless speakers made useful.


My new tables have a number of benefits.  First they are high enough to reach as most side tables are two low for the couches in this room.   Second they take the place of a coffee table, which I am not allowed to have in this or any room.   Third, they just look pretty.   And finally, my husband gets to keep his speakers.   In a sense.


Wednesday, November 18, 2009

Elements of a Room in Progress - first corner


Slowly (9 years after moving in) I am finding the energy and inspiration to do something with my Problem Room. This is the room at the front of the house which in spite of its size (large) and light (perfect in the morning) we have never really done properly. It is a formal room but I do want to to be used.

It gets dappled light through the leadlight windows and is quite the perfect place to read, sit in front of the fire or to take a little tea or gin and tonic.

Here are the basic elements so far:


(Persian rug, 5 m by 4m)


(shot of one of the couches, 2 and 3 seater, upholstered in pale green corduroy type fabric)


(one of the windows, this is in the creepy alcove, there is also a bay window)


(this is our disco ball light, I think it is Swedish)


(this is it switched on - I sometimes think it may take out the local powergrid)


(some of the bird prints)


(we have to keep this it is from the 1950s or maybe earlier and was my husband's grandparents)

As you can see there is quite a lot of green going on. The colour of the new century. So who could be more suitable than that early 20th century dark soul, Gustav Klimt. So, my idea is that the room would be a suitable place to display this.


Or this.


I think planning a room around a painting one will never own is just as good a starting point as any.

And this is what I have done so far. One corner.


The size of the room makes it difficult to plan. I am beginning to think I need to have little sitting spots, different zones and areas to make it work. Something like these:


Is this approach sound? I hope it doesn't take me another 9 years to finish this room!

(Images - Jane and last three Homes and Gardens UK)

Related Posts with Thumbnails